


Building a PLC cabinet can seem challenging at first. But with the right steps, it’s manageable.
A PLC (Programmable Logic Controller) cabinet is essential for industrial automation. It houses the PLC and other vital components, ensuring safety and functionality. Whether you are a novice or have some experience, this guide will help you understand the process.
We will break down the steps, making it easy to follow. From selecting the right materials to wiring and testing, every detail matters. By the end, you’ll have a solid foundation on how to build a PLC cabinet efficiently. Ready to get started? Let’s dive in and simplify the process together.
Contents
Introduction To Plc Cabinets
Building a PLC cabinet may seem daunting at first. Yet, it’s an essential task for many industrial applications. A PLC cabinet, or Programmable Logic Controller cabinet, houses the brains of an automated system. These cabinets protect and organize the hardware components needed to run complex processes. Let’s dive deeper into the world of PLC cabinets.
What Is A Plc Cabinet?
A PLC cabinet is an enclosure. It stores the PLC and other related components. These components include power supplies, relays, and input/output modules. The cabinet ensures everything stays in place. It also provides easy access for maintenance. Think of it as a control center. It manages and monitors machinery and processes. The PLC receives inputs, processes them, and sends outputs. This keeps the entire system running smoothly. The cabinet keeps everything safe and organized.
Importance Of Plc Cabinets
PLC cabinets play a crucial role in industrial automation. They protect sensitive equipment from dust, moisture, and other environmental factors. This extends the lifespan of the components inside. It also ensures consistent performance. Organization is another key benefit. A well-designed PLC cabinet keeps everything tidy. This makes troubleshooting easier. Technicians can quickly identify and resolve issues. This reduces downtime and increases productivity. Safety is another reason PLC cabinets are vital. They provide a barrier between high-voltage equipment and workers. This reduces the risk of electrical accidents. A safe work environment is a productive one.

Credit: www.awc-inc.com
Essential Tools And Materials
Building a PLC cabinet is a detailed task. It requires the right tools and materials for success. Knowing what to gather before starting can save time and avoid frustration. Below are the essential tools and materials you need.
Basic Tools Required
To build a PLC cabinet, you need the following basic tools:
- Screwdrivers: Both flathead and Phillips.
- Wire strippers: Essential for cutting and stripping wires.
- Pliers: Needle-nose pliers are useful for gripping and bending wires.
- Multimeter: For measuring voltage, current, and resistance.
- Cable ties: Keeps wires and cables organized.
- Label printer: Helps in labeling wires and components.
Materials Needed
The materials you need for building a PLC cabinet include:
| Material | Description |
|---|---|
| PLC Unit | The main control unit for automation. |
| Cabinet | The enclosure that houses all components. |
| DIN Rails | Mounting rails for PLC and other devices. |
| Wiring | Cables for connecting components. |
| Terminal Blocks | For connecting and securing wires. |
| Relays | Switching devices for controlling circuits. |
| Fuses and Circuit Breakers | Protection devices for preventing overloads. |
Having these tools and materials ready will ensure a smooth process. It will help in building a reliable and efficient PLC cabinet.
Planning Your Plc Cabinet
Building a PLC cabinet requires careful planning. Proper planning ensures a functional, safe, and efficient system. Let’s explore key steps in planning your PLC cabinet.
Design Considerations
When planning your PLC cabinet, several design considerations are crucial:
- Space: Ensure there is enough space for all components.
- Heat Dissipation: Maintain proper ventilation to prevent overheating.
- Accessibility: Components should be easily accessible for maintenance.
- Future Expansion: Plan for future upgrades or expansions.
Consider the environmental conditions where the cabinet will be placed. High humidity or dust can affect the components. Use appropriate enclosures to protect them.
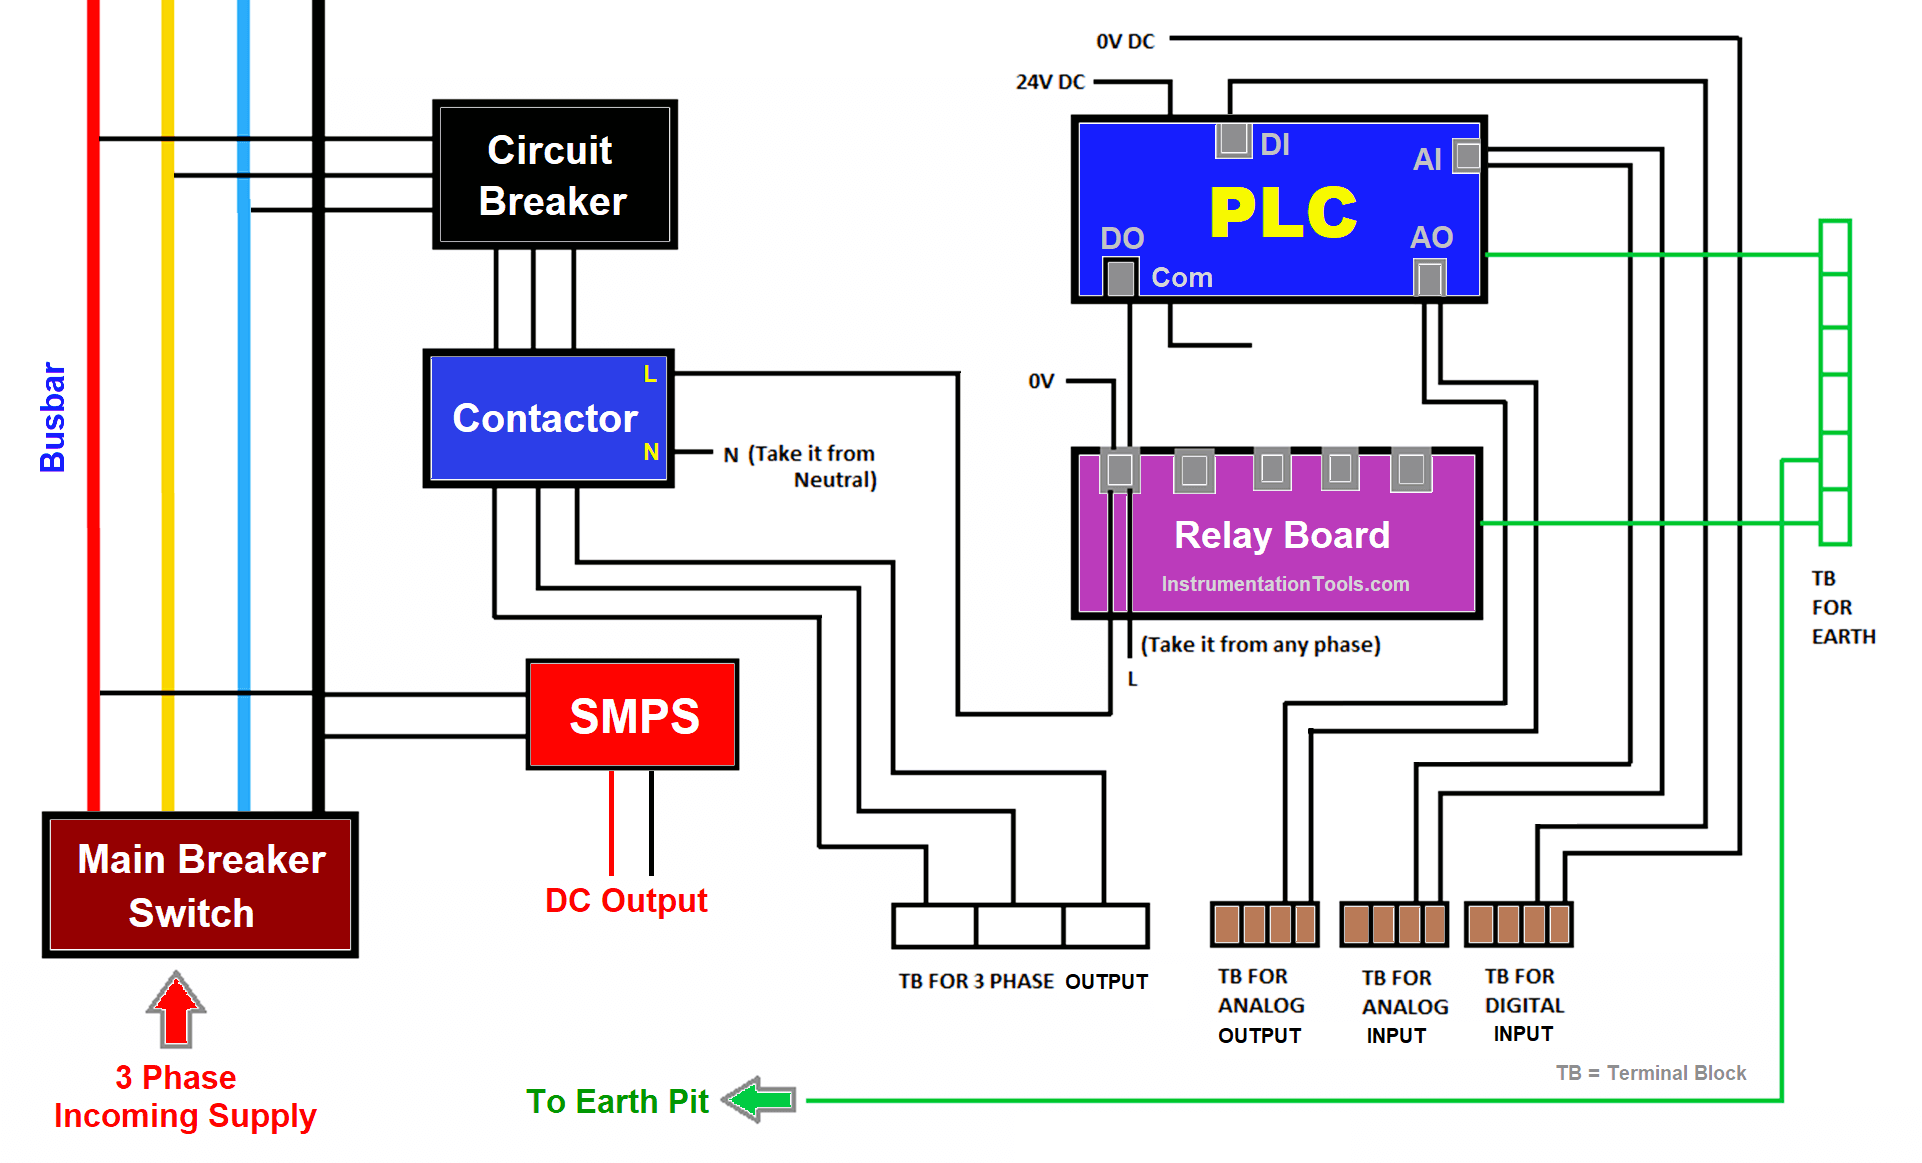
Creating A Wiring Diagram
Creating a wiring diagram is an essential step in planning your PLC cabinet. It helps in organizing and connecting all components properly.
- Identify all components: List all PLC components, such as power supplies, controllers, and I/O modules.
- Draw the layout: Sketch the physical placement of components within the cabinet.
- Connect the components: Use lines to represent wiring between components.
- Label wires: Clearly label each wire for easy identification.
A well-drawn wiring diagram ensures clear understanding and helps in troubleshooting any issues. Planning your PLC cabinet with these steps ensures a well-designed and functional system.

Credit: www.reddit.com
Building The Cabinet Frame
Building the cabinet frame is a crucial step in setting up a PLC cabinet. This structure provides a strong foundation for all the components inside. Let’s dive into the details of selecting the enclosure and mounting the back panel.
Selecting The Enclosure
The enclosure is the outer shell of the cabinet. It protects the internal components from dust, moisture, and other environmental factors. Choose an enclosure made from durable materials. Steel and aluminum are good options. Ensure it has enough space for all your PLC components. Measure the dimensions carefully. Allow extra room for future expansions.
Mounting The Back Panel
The back panel serves as the mounting surface for all internal components. It needs to be sturdy and well-secured. First, mark the positions for mounting holes. Use a drill to create these holes. Attach the back panel to the enclosure using screws. Ensure it is level and firmly in place. A stable back panel ensures the longevity of your PLC cabinet.
Installing Electrical Components
Installing electrical components is a crucial step in building a PLC cabinet. These components ensure the system runs smoothly and efficiently. Proper installation prevents malfunctions and safety hazards. Attention to detail is key here. Each component must be installed correctly. This ensures seamless integration into the system.
Mounting Plc Hardware
Start by mounting the PLC hardware on a back panel. Use a suitable enclosure to protect the components. Position the PLC in an easily accessible area. This helps with future maintenance and troubleshooting. Secure the PLC with screws or bolts. Ensure it is firmly attached to avoid vibrations. These can damage the hardware over time. Double-check the alignment to ensure all ports are accessible.
Installing Terminal Blocks
Next, install the terminal blocks. These components manage the wiring connections. Choose blocks that are compatible with your system. Place them near the PLC for easy wiring. Secure the terminal blocks using screws. Ensure they are tightly attached. Loose connections can cause electrical failures. Label each terminal for easy identification. Connect the wires to the terminals. Follow the wiring diagram closely. This ensures proper connections and system functionality.
Wiring The Plc Cabinet
Wiring the PLC cabinet is a critical step in building a functional and reliable system. Proper wiring ensures that the PLC cabinet operates safely and efficiently. This section will guide you through the essential aspects of wiring, covering both power and signal wiring. Follow these instructions to ensure your PLC cabinet is wired correctly and meets industry standards.
Power Wiring
Power wiring is the first step in wiring the PLC cabinet. Start by connecting the main power supply to the cabinet. Ensure the power supply is compatible with your PLC system. Use proper gauge wires to handle the current load safely. Label all wires clearly for easy identification during maintenance. Secure the wires using cable ties to prevent movement and damage. Next, connect the power supply to the PLC unit. Check the voltage requirements of the PLC before making connections. Use a multimeter to verify the correct voltage. Make sure the ground connections are secure to avoid electrical hazards. Follow the manufacturer’s guidelines for power wiring to ensure safety and compliance.
Signal Wiring
Signal wiring connects the PLC to sensors, actuators, and other control devices. Use shielded cables to reduce electrical noise and interference. Label each cable at both ends for easy troubleshooting. Ensure the signal wires are kept separate from power cables to avoid interference. Connect the signal wires to the PLC input and output terminals. Double-check the connections to ensure they match the wiring diagrams. Use terminal blocks for a clean and organized setup. Secure the wires to prevent accidental disconnections. Test each connection to verify proper operation. Organize the signal wires neatly within the cabinet. Use wire ducting to keep the wires in place. This prevents clutter and makes future maintenance easier. Proper signal wiring ensures reliable communication between the PLC and connected devices.
Testing And Troubleshooting
Testing and Troubleshooting are essential steps in building a PLC cabinet. These steps ensure that the cabinet operates correctly and safely. This section will guide you through the initial power-up phase and highlight common issues and fixes.
Initial Power-up
Before turning on the power, double-check all connections. Ensure that all wires are securely attached. Confirm that the power supply is set to the correct voltage. Once everything looks good, switch on the power. Observe the PLC for any error messages. If the PLC powers up without errors, proceed to test the inputs and outputs. Use a multimeter to verify the voltage levels at different points. Ensure that signals are reaching the PLC as expected. This step is crucial for identifying any potential issues early on.
Common Issues And Fixes
During testing, you might encounter some common problems. Here are a few issues and their solutions:
| Issue | Possible Cause | Solution |
|---|---|---|
| No Power to PLC | Incorrect wiring | Check and correct the wiring |
| Error Messages on PLC | Configuration errors | Review and update the configuration |
| Inputs Not Detected | Faulty sensors | Replace or repair sensors |
| Outputs Not Working | Relay or fuse issues | Inspect and replace relays or fuses |
Check the wiring if the PLC does not power up. Ensure no loose connections exist. Sometimes, a simple reconnection can solve the issue. If you see error messages, consult the PLC manual. It will help identify the error codes. This can save time and effort in troubleshooting. When inputs are not detected, inspect the sensors. They might be faulty or misaligned. Replacing or realigning them can often fix the problem. If outputs are not working, check the relays and fuses. They might need replacement. Ensure all output devices are functioning correctly.
Credit: www.shenler.com
Finalizing The Build
Once you have assembled most of your PLC cabinet, it’s time to finalize the build. This stage ensures everything is secure, organized, and ready for use. Follow these steps to complete your PLC cabinet efficiently and correctly.
Securing Wires And Components
Start by securing all wires. Use cable ties to keep them in place. This helps in preventing any loose wires. It also makes the cabinet look neat. Ensure each wire is connected firmly to its terminal. Check the connections one more time for security. Next, secure all components inside the cabinet. Tighten any screws that may have become loose. Ensure all devices are firmly attached. This prevents movement and potential damage during operation. Proper securing also ensures safety.
Labeling And Documentation
Label all wires and components. Use clear and durable labels. This makes future maintenance easier. Labeling helps in identifying each part quickly. It’s crucial for troubleshooting and repairs. Prepare thorough documentation of your build. Include wiring diagrams, component lists, and any modifications. Keep this documentation in a safe place. Good documentation saves time and effort in the future. It also helps others understand the setup.
Maintenance And Safety Tips
Building a PLC cabinet is only the beginning. Regular maintenance and strict safety measures are crucial. Both ensure the system runs smoothly and prevents accidents. Below are essential tips for maintaining your PLC cabinet and keeping it safe.
Routine Maintenance
Regular maintenance extends the lifespan of your PLC cabinet. Inspect the cabinet for dust and debris. Dust can cause overheating and malfunctions. Clean the cabinet interior every few months. Use a vacuum or soft brush to remove dust. Check all connections and wiring. Loose wires can lead to system failures. Tighten any loose connections. Look for signs of wear and tear. Replace damaged wires immediately. Test the cabinet’s functionality regularly. Make sure all components are working correctly.
Safety Precautions
Safety is paramount when working with PLC cabinets. Always turn off the power before maintenance. Use insulated tools to prevent electrical shocks. Wear appropriate safety gear, such as gloves and goggles. Label all components clearly. Proper labeling helps in quick identification. It also reduces the risk of errors during maintenance. Keep a fire extinguisher nearby. Electrical fires can happen. Be prepared to act swiftly. Follow the manufacturer’s guidelines. Each PLC cabinet may have specific safety instructions. Adhere to these guidelines to ensure safety. Train staff regularly on safety protocols. Everyone should know how to handle emergencies.
Frequently Asked Questions
What Tools Are Needed To Build A Plc Cabinet?
You need a screwdriver, wire stripper, drill, and multimeter. Basic hand tools will also be helpful.
How Do You Wire A Plc Cabinet?
Connect power supply, input/output modules, and PLC. Ensure all connections are secure and follow the wiring diagram.
What Safety Precautions Should Be Taken?
Always power off before wiring. Use insulated tools. Double-check connections to avoid short circuits and electrical hazards.
Conclusion
Building a PLC cabinet can seem complex, but it becomes simple with practice. Start with a clear plan. Gather your tools and materials. Follow safety guidelines closely. Proper wiring and labeling are crucial. Double-check connections to avoid errors. Test your setup thoroughly.
A well-built PLC cabinet improves system efficiency. With these steps, you can create a reliable and organized PLC cabinet. Keep learning and refining your skills. Happy building!